Really, I love everything about my compost bin. It has been a huge success, if it weren't for the one annoyance of a rat. And after many hours of internet browsing on the subject, I realized I was half way to having a bin that rats couldn't get into. I didn't need to break it down and start with something else. I needed to simply make some design modifications.
So I emptied out my bin, which was half a day's work in it's own.
The uncomposted material got buried in the beds I don't plan to plant in for a few more months. The finished dirt got thrown on the top of my spring garden beds. The upside is my raised beds are ready for planting.
Then it was time to retrofit my compost bin. I found my inspiration on the internet with this compost bin that is purportedly rat proof:
I loved the design elements of this bin, and decided to copy it, using the frame of the bin I'd already made. Gone was my warped plywood top and the big (also warped) front panel that has to be taken off in one large piece. In it's place were lids like these, and front panels on "tracks". Having the front come off is HUGE for me, as I find it a total design flaw to have closed compost bins that only open in the top. Anyone who has tried to shovel and turn compost knows how problematic that is.
I started with the bottom. Unlike the inspiration bin pictured above, I want my bin sitting on the ground. My bin attracts worms, so it is very much a vermicompost. But to make that work, worms need to come up from the ground. I also don't like the idea of space under the bin, as that's the perfect hiding spot for rodents to gnaw their way through wood.
Instead, I put a double layer of 1/2" galvanized hardware cloth along the bottom. I edged it in metal galvanized strapping tape, screwed down so the cloth wouldn't pull off with the weight of the compost on top of it.
I then put a single layer of hardware cloth across the back and sides. Instead of simply relying on staples, I edged off the hardware cloth with wood lath (cheaper than the galvanized strapping tape), so it couldn't be pulled away at the edges.
With the bottom, back and sides done, it was time to work on the front panels.
I laid in tracks for 1 x 6 x 6 (cut to 3' lengths) redwood fence boards to slide into.
And here we have the finished panels!
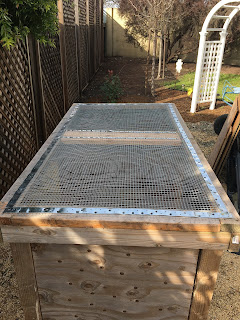
The last addition was new lids for the top, heavier and sturdier than my original design.
I framed out the lids, and used another double-layer of 1/2" hardware cloth for the top. Another design alteration from my original bin was to make the top of cloth instead of enclosed wood. When you research compost bins on the internet, they caution you to cover them to prevent them from getting too wet. I've learned, that's advice for people who don't live in California. Here, we want to take advantage of any rain we get to wet down our bins. In the event we have major storms that could flood the bin, I can always put a tarp on it. But for 99% of the time, I want to use free rain to water my bin, instead of hosing it with water I have to pay for!

And here is the finished bin!
Will it be rat proof? Only time will tell. But you can be sure that I will keep you posted!


