Saturday, November 17, 2018

Gardening for Garlic!

Being it's garlic planting season, I was talking with a gardener friend about how much garlic we grow in our gardens.  In my house, I grow a lot because we use garlic on an almost daily basis.  I can easily go through two large braids of garlic before next year's crop is ready.

My friend said he would use it more often if it weren't such a pain to crush and chop at meals. That's when I shared my method for doing it all at once and enjoying the benefit for weeks and weeks to come.

Before we start, I know that you can buy garlic in the store in jars very much like this.  My biggest complaint--beyond enjoying growing my own--is that jarred garlic is typically packed in water.  Thus, when you throw it in hot oil, it splatters all over your stove.  I pack chopped garlic in olive oil and refrigerate, so when cooked, it is--in every sense--just like peeling and chopping on the fly.

Start by peeling whole cloves.  I typically do 2-3 bulbs of garlic at a time.  That lasts us anywhere between 4-8 weeks and so far, I've never had it go bad on me.


I have a mini food processor.  I highly recommend them for small jobs like garlic and herbs.  I have not tried this in my full sized processor, so I don't know how well it chops cloves.  The smaller processor is ideal.  I process in batches and keep the processor running until it's not chopping much anymore.


This is my "garlic Tupperware" container.  Once processed, I mix the chopped cloves in olive oil.  Enough to fully cover all the garlic, but not leave it "swimming" if you know what I mean.


I then smooth out the top.  Once in the fridge, this will solidify, which is fine.  That will have no impact once you spoon out and cook with it.


I have not been scientific about how long this will keep.  But I'm sure I've had a single batch in the fridge for more than 8 weeks.  It's never gone bad or gotten moldy.  But I will tell you, it is AWESOME having a container of fresh garlic in olive oil handy and ready for cooking!

As Jacque Pepin used to say, "Happy Cooking!"

Sunday, May 20, 2018

May Garden Check-In

It's the end of May and I've planted out every square inch of my garden this year. I've got all kinds of food planted at various stages of ripeness.

This photo is the tomatillos, my first year growing them.


I'm battling nasturtiums.  They are all volunteers and I've pulled out most of the ones trying to grow where my veggies are.  Even these on the perimeters are trying to take over, and I'm having to cut them back to leave sun space for my veggies.  But they are gorgeous this time of year.


These are my new raised beds, and I'm thrilled that everything I've planted here is happy.  You never know when you put in a new bed if the plants will love or hate it.  These plants are going gangbusters already.


Today I planted out the last of my peppers.  I had trouble starting my pepper seeds this year, so the bed is a mix of plants I started myself and those I bought from various nurseries.  I'm also caging them this year.  In fact, I'm putting up a ton of tomato cages this year, not for tomatoes but for sunflowers, pole beans, peppers and other plants that do well with a little extra support.


More nasturtiums.  I think they are the inspiration for many 50's creature feature films, like "The Blob", and "Little Shop of Horrors" haha.


Shelling peas are in abundance right now.  Soon, I will have to start searching for the mature pods.  We will have fresh peas for a number of weeks starting soon!


Today we pulled the first of the spring carrots.  I planted a new variety from Johnny's Seeds, "Rainbow".  They mature in a variety of colors from orange to yellow to white, and they are DELICIOUS!!  Here's the link:  Rainbow


I've also grown Oregon Snow Peas which have yet to flower.  On the sunny side of them are herbs and two varieties of squash.  And...of course...volunteer nasturtiums!


I'm caging my bush beans this year.  These are kidney beans growing on the sunny side of slicing and pickling cucumbers.


And sunflowers, to mark the beginning of summer growing season!


Tuesday, March 6, 2018

It's Not Just Vegetables

What I love about this house is the many spaces outdoors.  On this blog, we see a lot of the vegetable garden.  But there's also a bird garden and a back patio space that we spend a lot of time in.  And today, those spaces got a lot of attention.

Rain is coming, and it's in the forecast for about the next 12 days, so I took a day off work to do some spring prep while the sun was out.  I love gardening before rain comes.  I get to mess things up, then the rain soaks everything down.  Kind of like grouting a mosaic piece.  Rain in the garden sets it all in place.

This bed along the back wall got a lot of attention.  The redwoods drop fronds all year round, and I've learned that having a lot of wires from solar lights and tubes from the drip system running through it makes it hard to rake out the fronds.  So I pulled the drip, replacing it with emitters on the main tube line that runs along the back wall.  I also pulled some solar lights and in general, cleaned it up.  This year, my goal is to see this bed filled with flowers and shrubs instead of redwood fronds and volunteer clover.


I'm giving a couple azalea bushes a try.  I also planted Dahlias and a Peony.  I hope all do well, but given I planted them as tubers, I have a couple months before I find out.


I planted these Photinia several years ago with the plan that they would be pruned to small patio trees.  I've got two other spots in the yard where I've done the same, but these are the first two that have grown full enough to prune up the bottom.  I LOVE the result!!  They're about to flower and will be a lovely showcase next to the spring patio.


It literally looks like it snowed in the bird garden.  The fruitless plum is in full bloom and dropping petals.  Now that it is full grown, it's providing too much shade to the shrubs I had there before, so I pulled them out and made a bed for Hostas next to these Iceberg rose bushes.  I hope they do well.  I've never grown Hostas and hope they are keepers!


This corner had Hydrangeas which never did well.  They were great in the spring, but the summer heat would come and they'd dry out like a bone.  I tried adding more drip lines, but that didn't help, so...sorry:  My gardening rule is if you can't thrive with what I'm willing to give you, you're gone.  I've replaced them with Cala Lillies and I'm hoping they do better.  Forever, I've wanted Cala Lillies back in my garden (I had them in Petaluma).  I hope these are keepers.


So that's it for now.  Time to go back to work tomorrow and get some rest! Haha!

Sunday, February 25, 2018

Ready, Set, Spring!!

With more planting space, this year I will have the largest garden I've ever had, and am introducing lots of new-to-me vegetables and varieties.

Here's my list:

The peppers and tomatoes I've already started from seed.  English peas and carrots are in the ground, as is the garlic I'd started last fall.  The rest will probably go in around the first of April, unless it looks as though these frosty nights will continue into spring.

With rain in the forecast for this week, I got out in the garden and emptied my compost bin into the beds, spread some granualized vegetable fertilizer, high in calcium and phosphorus, then topped with SuperSoil and steer manure I had left over from my raised bed project.  With a good soaking and time to rest, these beds will be ready for plants in a month.


I also added this new bed next to the arbor in our back yard.  I'd tried growing a clematis, but it didn't do well directly in the ground.  Now I'm trying this raised half circle and will be planting red runner beans on the one side.  Lets see if that works better.

So ready, set go.  I can't wait to get this all growing!!  C'mon spring!!

Sunday, February 18, 2018

The Landscaping Project I Did After Swearing I Wouldn't Do Any More Landscaping

It started with a conversation with a friend from work. We were discussing the seeds we're starting for our summer gardens. Every year, he grows 30+ different varieties and I'd asked what was his favorite. Hands-down: Atomic Grape from Baker Creek. He said I need to try it, and--in fact--if all his seeds sprout, he'll have two extra. He'll give me one. I told him my space was small (I'd already plotted out what to plant this year!) and he said if I have to grow it in a bucket, grow it. I won't be sorry.

So I go back to my garden plans, looking for where I can add one more tomato. My friend's bucket suggestion was out. I don't do container gardening, or any growing that requires extra fertilizer and hand watering. I need a spot where I can grow in the ground, with a drip line attached to the timer in the garage.

The next conversation happened in my head between me and the part of my sub-conscious I call Evil Energy. Evil Energy always thinks I'm full of limitless power, money, and time to follow any whim that crosses my mind. It went like this:

Evil: "Add a raised bed to that spot you've been eyeing for 8 years."

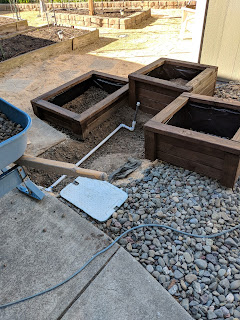
Evil was referring to this one:


Me: "That's a landscaping project. I said I'd never do another landscaping project, and I don't have the money to contract it out."

Evil: "It would be a piece of cake. Here's another idea, make THREE beds, different heights. It would be that perfect separation between the garden and the rest of the yard, and it would take care of that awkward partition between the gold garden rock and the gray river rock. You know that's always bugged you."

Me: "It would be a lot of work. Backbreaking, even."

Evil (ignoring my protests): "Then you could get an arbor that crosses the two beds, and get rid of all those wires you and Tommy put up to string green beans to the shed and the house. Wouldn't that be beautiful? It would arch over the steps to the shed, like the grand entrance your space needs."

Me: "That's a lot of work and now even more money."

Evil: "You can do it! You DESERVE it!"

Me: "I deserve a little R&R."

Evil: "I thought this was going to be The Year Of The Garden. You even boasted about that on Facebook. What was the point if you're just going to plant the same old shit you planted last year?"

Me: "F&#$ you, Evil. That was a low blow."

Evil: "It'll be a piece of cake. Will take you one weekend, two tops."

Evil was wrong. It took FOUR weekends and nearly broke my back. Because Evil neglected to remind me that under the top soil in my garden is about 2" of crushed gravel from the lawn that had been there before we bought the house. And for my raised beds to do well and take advantage of that nutrient-rich clay down under, I'd need to get that gravel out before filling my beds with soil and compost. Suffice to say, it was NOT a piece of cake.

Nonetheless, I dove in.  I started by finding the right arbor then building the three raised beds.  That took two weekends, but was relatively easy (and kinda fun--shhhhh).


Next came shoveling out all the rock and peeling back the landscape fabric to expose the ground these beds would sit in.  I'd also stained the beds with weather sealing stain and lined the insides with plastic.  My hope is, these beds will outlast me.


Then came two full days of shoveling out a wheelbarrow full of crushed gravel, leveling the beds on the slant that is my back yard, and tapping into the existing irrigation line (a complete pain in the ass).


When I'd finally finished all that, the beds weren't exactly in the position I'd planned.  But the reality of what the yard "wants to do" usually takes over my ideas on where I want things.  But it is close enough for government work.


And I confess, now that it's done, I'm thrilled.


Usually, when I start a project of any kind, I have a 50/50 chance of it turning out like I'd originally seen it in my minds-eye.  I have about a 2 in 100 chance of it actually turning out better than I'd thought.  In this case, my idea of staining the beds a dark maple to contrast with the light rock made this even nicer than I'd expected.  it also gave me an opportunity to freshen up the rock that was getting thin and dirty from years of weather.


So, there you have it.  I'd said I wasn't going to do another landscaping project.  That I'm too old for this, and anything done in the future would be hired out.  I did hire out the last project.  It was expensive but worth it (replacing two of my wood garden beds with stone).  But NOW I'm done with landscaping projects.

Evil:  "At least...until next year....when it's time to replace the wood framing on those other three beds.  And since you'll want them to match these new ones, you'll need to make them yourself.  And since the crushed gravel has already been removed in those beds, replacing the wood frames will be easy.  A piece of cake!"

Nooooooooooooo!!!!

Sunday, January 28, 2018

The Need For More Space

Can I get a show of hands?  How many gardeners have looked at their plot and wished they had just a little more space to grow just a few more things?

Wow, that's a lot of hands.

Every spring, it's the same for me.  I'm always so filled with hope, so sure that this year, everything I plant will produce a lush cornucopia of plump, colorful fruit.  As such, I scan every empty corner of my garden space with an eye on adding a few more square feet to showcase my sumptuous bounty. 

Every year, I want more space, and every year, I don't get around to making it.  But this year, "2018 The Year Of The Garden", I am.  And the spot I've chosen is this empty space next to my workshop.


The space wasn't always empty.  Back in 2010 I put wine barrels here, lovingly arranged and colorfully stained, they were going to add a few more square feet of growing space for flowers and vegetables.  Unfortunately, container growing requires watering by hand and frequent fertilizing.  I'd thought putting these right next to the hose and only a few feet from a watering can and MiracleGro, I could keep up with it.  But alas, I am too lazy even for that.  Due to lack of care, I could never get anything to do well in these barrels.  And in the end, this photo of them empty was about as beautiful as the spot ever got.  So several years later, these barrels ended up as passengers in our bi-annual dump run.


My second try at this space will employ the same concept, though.  I like the idea of tiered planters.  This is the spot where the side vegetable garden meets the back entertainment section of our yard, so I kinda like something that will bridge the two spaces with decor and functionality.  But this time, the planters will be in the ground and with drip irrigation installed.

It will also have an arch that will trellis things like beans, cukes or tomatoes.  I just purchased this one from Hay & Needle.


So, stay tuned for updates to this project.  I have a timeline to get this done in plenty of time to plant this spring, so I'll need to hop to it!

Tuesday, January 23, 2018

2018 The Year of the Garden

Last fall, I tried my hand at canning for the first time ever.  I've always been afraid of canning, fearing that if I did it wrong, I would poison all my friends and family.  But my desire to do something with green tomatoes pushed me to buy some books and materials and give canning a green tomato relish a try.  And what I found was, not only was it delicious, canning was fun and easier than I thought it would be!

Thus, I've coined 2018 "The Year of the Garden".

In typical LoriBee fashion, now that I've had one success at canning, I'm going full speed into this year's growing season with designs on doing even more.  On the list:
  • More green tomato relish.  Here's the recipe I used.
  • Fresh Packed Dill Pickles
  • Green Tomatillo Salsa or Sauce
  • Red Salsa
  • Marinated Green Beans
Granted, I don't know if I will get to all of them, but as I plan out what to plant this year, I'm making sure to grow the supplies I need for all of them.

I'm also growing a number of varieties I've never tried before.  Here's a photo shot of all the seeds I bought this year:


As my planting space is only a little over 100 sq ft, I'm packing a LOT into a small space, capitalizing on vertical gardening as much as possible.

Toward that effort is my new garden tunnel.  I'd actually put this up while in the middle of chemotherapy, and it's been sitting here all winter waiting to be showcased.  I can't wait to see it covered in beans and tomato vines!


Another thing that helps me pack a lot in a small space are my planning tools.  I have three things I live by when it comes to planning out my garden.  The first is my garden plotter.  It's basically a blank template of my garden beds that I use to decide what is planted where and when.  Here's this season's version:
As you can see, it's been marked, remarked, notated and scribbled.  (The garden is always plotted in pencil, since one glance through a seed catalog can change everything.)

I've also been pretty good about keeping a planting log of all the things I've tried, when I planted, and how well they did.  Though there are "gap years" where I didn't log much, I've found those years I did log have become invaluable to me.  While weather and circumstance never guarantee that one year will turn out exactly like the last, this helps me recollect what I've tried and what worked/didn't.  I give each "try" a grade and comment when necessary.  Though I don't always follow my own advice, it's fun to look back and see what I did.


My final planning tool is this great book for those of us who live in the San Francisco Bay Area.  It's my favorite garden book and I refer to it often, especially when trying something new:


So here we go into 2018!  When it comes to the garden, I've been neglectful of this blog since the advent of Facebook, but I'm bringing it back.  I find blogging is fun, and much more organized than a series of random posts.  So in the spirit of 2018, The Year of the Garden, let's get to it!